Resizing Screenshots for Blog Posts
A toolchain for resizing and renaming oversized blog screenshots, using Greenshot, Image Resizer, and Joe on Windows, with a similar workflow sketched out for macOS.
Often enough the screenshots, supposed to be used for blogging, are too large for the blog post. Especially when using a display with high resolution (Retina and Retina-like displays), this affects almost every screenshot.
Such a large screenshot in a blog post looks not nice, and often the right side is cropped.
This blog post describes my toolchain for resizing screenshots on Windows and macOS.
Windows
Make the screenshot
Usually I create my screenshots with Greenshot. It allows the user to easily add some symbols and text. Depending on the scaling later, I ensure to have multiples of 2 or 4 as the size on both axes. (see below)
Scale the screenshot
After saving all the screenshots, I resize them all together with Image Resizer for Windows.
Image Resizer creates a new menu entry in File Explorer which appears when right-clicking an image file.
Depending on the original size I scale them down to 25 or 50 percent (not pixels). With these values I hope for a perfect quality. That’s why I chose these multiples.
The tool saves the shrunk images with a new filename next to the existing files. The new name is the old name suffixed with (Custom).
e.g.WindowsServer.IIS.Install.06.1.png
becomesWindowsServer.IIS.Install.06.1 (Custom).png
Rename the screenshot
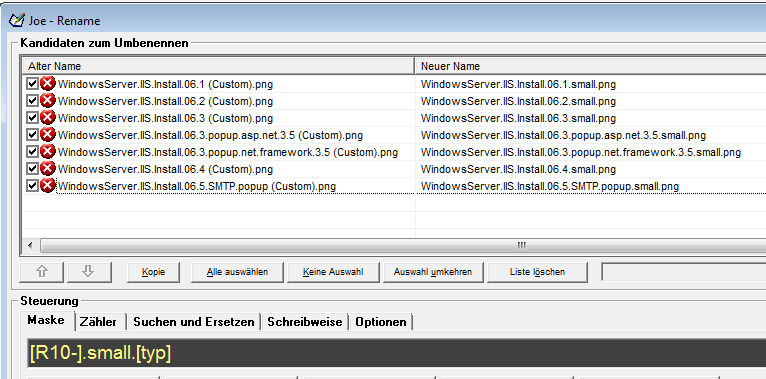
Since years Joe is my friend for renaming. (btw: some older versions are still available and for free).
The renaming pattern [R10-].small.[typ] replaces the last 10 chars of the filename with the text .small. So the sample above transforms fromWindowsServer.IIS.Install.06.1 (Custom).png
toWindowsServer.IIS.Install.06.1.small.png
macOS
t.b.c.
Starting points:
- Make screenshot with CMD + CTRL + SHIFT + 4
- Save it (paste it onto OneNote and save it from there)
- Copy all screenshots
- Preview all copied screenshots
- Use the Adjust Size function
- Save all during quit
- Rename the shrunk images with Finder