Shrinking GoPro Videos with HandBrakeCLI
A HandBrake and HandBrakeCLI based toolchain for batch-shrinking GoPro videos and moving the large originals to an unsynchronized OneDrive folder to save local disk space.
This blog entry describes a HandBrakeCLI based toolchain to shrink videos and keep the footprint of videos on my daily machine smaller.
Motivation
Over the last years the videos of my activities get bigger and bigger. Notably the GoPro videos of the last two years occupied around 20 percent of my overall space of pictures and videos. Unfortunately this consumed too much disk space, so I ran often into scenarios with critical disk capacities on my machine.
Because I’m an Office 365 Home user there is the option to save enough stuff in the cloud (1TB), and with OneDrive it is possible to decide which folders should be synchronized. Putting the big beasts of video in such an unsynchronized location and keeping only a shrunk video in the local folders gives the chance to avoid losing videos as well as keeping the amount of necessary disk space small.
HandBrake is a tool with a sophisticated UI to transcode videos (convert formats, clip areas, change resolutions, …). It is perfect to transcode individual files, but the batch mode is not an option. Here comes HandBrakeCLI into play. It allows conversion as a command in a terminal session. Preparing the conversions with HandBrake and using the presets with HandBrakeCLI in batch mode will be the aim.
Install HandBrake and HandBrakeCLI
HandBrake and HandBrakeCLI were installed around two years ago. Unfortunately, in the later described circumstances they didn’t work together in a necessary manner. Additionally it was not so easy to update them. Last time I used homebrew (brew cask install handbrakecli). But this only installs an old version (0.10.5) which is again incompatible with HandBrake.
The web page HandBrakeCLI Downloads offers version 1.0.2 which is capable of supporting my workflow.
Something similar appeared with HandBrake. So also download it as a DMG from the web HandBrake Downloads and install it manually.
Prepare the preset
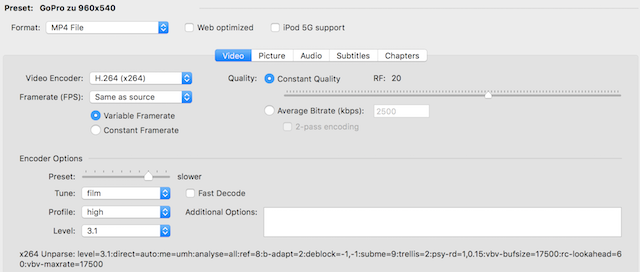
With HandBrake it is easy to create and test some presets. I started with a given preset for AppleTV or Android and adjusted the parameters for my needs.
Generic Options
| Parameter | Value | Remark |
|---|---|---|
| Format | MP4 File | I want to have mp4 |
Video Options
| Parameter | Value | Remark |
|---|---|---|
| Video Encoder | H.264 (x264) | H.264 is a good decision, not too new as H.265 and not too old as MPEG |
| Quality | Constant, RF 20 | Average Bitrate is necessary if you have to hit a file size limit and RF 20 is, according to other blog entries, good enough |
| Framerate | Same as source | it is faster to transcode and avoids picture defects |
| Encode Options | ||
| Preset | Slower | Seems to be a good balance between time and quality |
| Tune | Film | Because it is the best fitting option for my videos |
| Profile | High | - |
| Level | 3.1 | Good balance between new features and support for older devices |
Picture Options
| Parameter | Value | Remark |
|---|---|---|
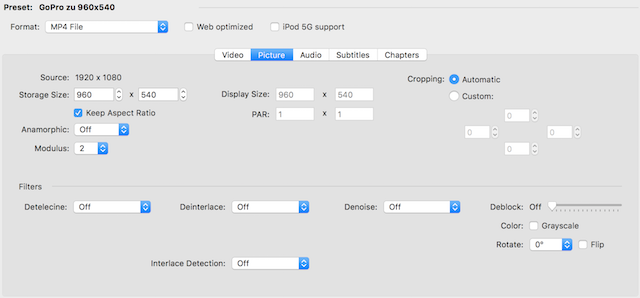
| Storage Size | 960x540 | Keep the same aspect ratio as the source! |
| Cropping | no cropping | all margins to 0 to avoid cropping |
| Anamorphic | Off | My sources aren’t anamorphic |
Audio Options
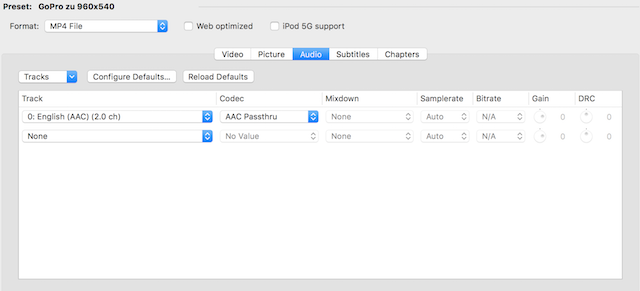
In case there are multiple audio tracks, delete the unwanted ones.
| Parameter | Value | Remark |
|---|---|---|
| Codec | AAC Passthru | Changing the audio format was not necessary. So I keep the original audio track |
Save that preset for later usage. I named that preset GoPro zu 960x540.
Use HandBrakeCLI in batch conversions
Now it is time to open a terminal.
Navigate to the folder where you’d like to shrink the videos.
Run this command:
for file in $(ls GOPR*.MP4); do
  HandBrakeCLI -v -i "${file}" -o "${file%.MP4}.small.mp4" -Z "GoPro zu 960x540" --preset-import-gui
done
What it does:
It collects all GoPro videos
for file in $(ls GOPR*.MP4)Transcodes each video
HandBrakeCLI -i ${file} ...By using the saved preset
-Z "GoPro zu 960x540"The saved preset comes from the HandBrake UI
--preset-import-guiSaves the transcoded video with an introduced
smallhint-o "${file%.MP4}.small.mp4"
Usually the shrunk videos have a new size between 10 and 25 percent of the original.
Use OneDrive to keep the huge originals
At the root level I have created a folder named zzz Large Files.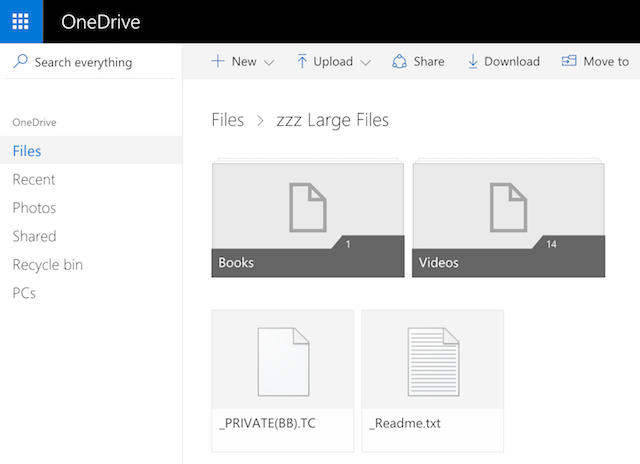
In the preferences of OneDrive I exclude this folder from synchronization.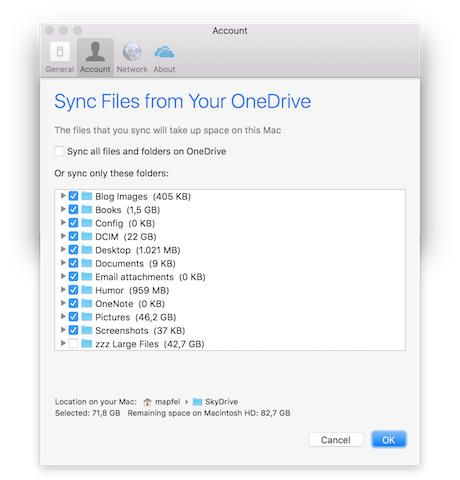
Now we can easily move the large originals via the web front end from the source folder to the new folder for our large videos.
During synchronization that will remove the large file from the source folder on the disk and keep the original without putting it on the disk.